使用字符级RNN生成名称
Ascend GPU 进阶 自然语言处理 全流程
概述
本教程中,我们将通过反向操作来生成不同语言的名称。这里仍通过编写由线性层结构构建出的小型RNN网络模型来实现目标。此次与《使用字符级RNN分类名称》这篇教程最大的区别在于,不是通过输入名称中的所有字母来预测分类,而是输入一个分类类别,然后一次输出一个字母,这种用于预测字符来形成一个单词的方法通常称为“语言模型”。
本篇基于GPU/Ascend环境运行。
准备环节
环境配置
本教程我们在Ascend环境下,使用PyNative模式运行实验。
[1]:
from mindspore import context

context.set_context(mode=context.PYNATIVE_MODE, device_target="Ascend")
准备数据
数据集是来自18种语言的数千种姓氏,点击这里下载数据,并将其提取到当前目录。
数据集目录结构为data/names,目录中包含 18 个文本文件,名称为[Language].txt。 每个文件包含一系列名称,每行一个名称。数据大多数是罗马化的,需要将其从Unicode转换为ASCII。
以下示例代码将数据集下载并解压到指定位置。
[2]:
import os
import requests
import tarfile
import zipfile

requests.packages.urllib3.disable_warnings()

def download_dataset(url, target_path):
    """下载并解压数据集"""
    if not os.path.exists(target_path):
        os.makedirs(target_path)
    download_file = url.split("/")[-1]
    if not os.path.exists(download_file):
        res = requests.get(url, stream=True, verify=False)
        if download_file.split(".")[-1] not in ["tgz", "zip", "tar", "gz"]:
            download_file = os.path.join(target_path, download_file)
        with open(download_file, "wb") as f:
            for chunk in res.iter_content(chunk_size=512):
                if chunk:
                    f.write(chunk)
    if download_file.endswith("zip"):
        z = zipfile.ZipFile(download_file, "r")
        z.extractall(path=target_path)
        z.close()
    if download_file.endswith(".tar.gz") or download_file.endswith(".tar") or download_file.endswith(".tgz"):
        t = tarfile.open(download_file)
        names = t.getnames()
        for name in names:
            t.extract(name, target_path)
        t.close()
    print("The {} file is downloaded and saved in the path {} after processing".format(os.path.basename(url), target_path))

download_dataset("https://mindspore-website.obs.cn-north-4.myhuaweicloud.com/notebook/datasets/intermediate/data.zip", ".")
数据处理
导入模块。
[3]:
import os
import glob
import string
import unicodedata
from io import open
定义
find_files函数,查找符合通配符要求的文件。
[4]:
def find_files(path):
    return glob.glob(path)

print(find_files('data/names/*.txt'))
['data/names/German.txt', 'data/names/Dutch.txt', 'data/names/English.txt', 'data/names/Italian.txt', 'data/names/Vietnamese.txt', 'data/names/Portuguese.txt', 'data/names/Korean.txt', 'data/names/Spanish.txt', 'data/names/French.txt', 'data/names/Russian.txt', 'data/names/Greek.txt', 'data/names/Arabic.txt', 'data/names/Irish.txt', 'data/names/Chinese.txt', 'data/names/Czech.txt', 'data/names/Polish.txt', 'data/names/Japanese.txt', 'data/names/Scottish.txt']
定义
unicode_to_ascii函数,将Unicode转换为ASCII。
[5]:
all_letters = string.ascii_letters + " .,;'-"
n_letters = len(all_letters) + 1

def unicode_to_ascii(s):
    return ''.join(
        c for c in unicodedata.normalize('NFD', s)
        if unicodedata.category(c) != 'Mn'
        and c in all_letters
    )

print(unicode_to_ascii('Estéves'))
Esteves
定义
read_lines函数,读取文件,并将文件每一行内容的编码转换为ASCII。
[6]:
def read_lines(filename):
    lines = open(filename, encoding='utf-8').read().strip().split('\n')
    return [unicode_to_ascii(line) for line in lines]
定义category_lines字典和all_categories列表。
category_lines:key为语言的类别,value为名称的列表。all_categories:所有语言的种类。
[7]:
category_lines = {}
all_categories = []

for filename in find_files('data/names/*.txt'):
    category = os.path.splitext(os.path.basename(filename))[0]
    all_categories.append(category)
    lines = read_lines(filename)
    category_lines[category] = lines

n_categories = len(all_categories)
将所有语言的数量和种类进行打印显示。
[8]:
print('# categories:', n_categories, all_categories)
# categories: 18 ['German', 'Dutch', 'English', 'Italian', 'Vietnamese', 'Portuguese', 'Korean', 'Spanish', 'French', 'Russian', 'Greek', 'Arabic', 'Irish', 'Chinese', 'Czech', 'Polish', 'Japanese', 'Scottish']
创建网络
该网络基于《使用字符级RNN分类名称》教程中的RNN网络进行了扩展,附加了一个与输入input和隐藏状态hidden连接在一起的类别category张量。该张量与字母输入一样采用one-hot编码。
该网络的输出为下一个字母出现的概率,将最有可能出现的字母作为下一次迭代的输入input。
与上一个网络结构略有不同,为了有更好的效果,在output combined层之后我们又添加了一个线性层o2o。与此同时也新添加了一个dropout层,该层以一定的概率(此处为0.1)将输入的部分随机归零。这一步骤通常用来防止过拟合。

[9]:
import numpy as np

from mindspore import nn, ops, Tensor
from mindspore import dtype as mstype

class RNN(nn.Cell):
    """定义RNN网络"""
    def __init__(self, input_size, hidden_size, output_size):
        super(RNN, self).__init__()
        self.hidden_size = hidden_size
        self.i2h = nn.Dense(n_categories + input_size + hidden_size, hidden_size)
        self.i2o = nn.Dense(n_categories + input_size + hidden_size, output_size)
        self.o2o = nn.Dense(hidden_size + output_size, output_size)
        self.dropout = nn.Dropout(0.1)
        self.softmax = nn.LogSoftmax(axis=1)

    # 构建RNN网络结构
    def construct(self, category, input, hidden):
        op = ops.Concat(axis=1)
        input_combined = op((category, input, hidden))
        hidden = self.i2h(input_combined)
        output = self.i2o(input_combined)
        output_combined = op((hidden, output))
        output = self.o2o(output_combined)
        output = self.dropout(output)
        output = self.softmax(output)
        return output, hidden

    # 初始化隐层状态
    def initHidden(self):
        return Tensor(np.zeros((1, self.hidden_size)), mstype.float32)
训练
准备训练
通过
random_training_pair函数随机选择一种语言和其中一个名称作为训练数据。
[10]:
import random

# 随机选择
def random_choice(l):
    return l[random.randint(0, len(l) - 1)]

# 随机选择一种语言和一个名称
def random_training_pair():
    category = random_choice(all_categories)
    line = random_choice(category_lines[category])
    return category, line
对于训练集中的每个名称,该网络的输入为:(category, current letter, hidden state),输出为:(next letter, next hidden state)。因此对于每个训练集,我们都需要categoryTensor(代表种类的one-hot张量),用于输入的inputTensor(由首字母到尾字母(不包括EOS)组成的one-hot矩阵)和用于输出的targetTensor(由第二个字母到尾字母(包括EOS)组成的张量)。
因为我们需要预测当前字母所对应的下一个字母,所以需要拆分连续字母来组成字母对。例如:对于"ABCD<EOS>",我们将创建出('A', 'B'), ('B', 'C'), ('C', 'D'), ('D', 'EOS')字母对。

我们在训练时会持续将category张量传输至网络中,该张量维度为<1 x n_categories>的one-hot张量。
定义
category_to_tensor函数将类别转换成维度为<1 x n_categories>的one-hot张量。
[11]:
def category_to_tensor(category):
    li = all_categories.index(category)
    tensor = Tensor(np.zeros((1, n_categories)), mstype.float32)
    tensor[0, li] = 1.0
    return tensor
定义
input_to_tensor函数,将输入转换成一个由首字母到尾字母(不包括EOS)组成的one-hot矩阵。
[12]:
def input_to_tensor(line):
    tensor = Tensor(np.zeros((len(line), 1, n_letters)), mstype.float32)
    for li, _ in enumerate(line):
        letter = line[li]
        tensor[li, 0, all_letters.find(letter)] = 1.0
    return tensor
定义
target_to_tensor函数,将目标值准换成一个由第二个字母到尾字母(包括EOS)组成的张量。
[13]:
def target_to_tensor(line):
    letter_indexes = [all_letters.find(line[li]) for li in range(1, len(line))]

    # 添加EOS
    letter_indexes.append(n_letters - 1)

    return Tensor(np.array(letter_indexes), mstype.int64)
为了方便训练,我们将使用random_training函数来获取随机对(category,line),并将其转换为所需格式的(category, input, target)张量。
[14]:
def random_training():
    category, line = random_training_pair()
    category_tensor = category_to_tensor(category)
    input_line_tensor = input_to_tensor(line)
    target_line_tensor = target_to_tensor(line)
    return category_tensor, input_line_tensor, target_line_tensor
训练网络
与分类模型依赖最后输出作为结果不同,这里我们在每一步都进行了预测,因此每一步都需要计算损失。
定义
NLLLoss损失函数。
[15]:
import mindspore.ops as ops

class NLLLoss(nn.LossBase):
    def __init__(self, reduction='mean'):
        super(NLLLoss, self).__init__(reduction)
        self.one_hot = ops.OneHot()
        self.reduce_sum = ops.ReduceSum()

    def construct(self, logits, label):
        label_one_hot = self.one_hot(label, ops.shape(logits)[-1], ops.scalar_to_array(1.0), ops.scalar_to_array(0.0))
        loss = self.reduce_sum(-1.0 * logits * label_one_hot, (1,))
        return self.get_loss(loss)
[16]:
criterion = NLLLoss()
MindSpore将损失函数,优化器等操作都封装到了Cell中,但是本教程rnn网络循环的每一步都需要计算损失,所以我们需要自定义
WithLossCell类,将网络和Loss连接起来。
[17]:
class WithLossCellRnn(nn.Cell):
    """构建有损失计算的RNN网络"""

    def __init__(self, backbone, loss_fn):
        super(WithLossCellRnn, self).__init__(auto_prefix=True)
        self._backbone = backbone
        self._loss_fn = loss_fn

    def construct(self, category_tensor, input_line_tensor, hidden, target_line_tensor):
        loss = 0
        for i in range(input_line_tensor.shape[0]):
            output, hidden = self._backbone(category_tensor, input_line_tensor[i], hidden)
            l = self._loss_fn(output, target_line_tensor[i])
            loss += l
        return loss
创建优化器、
WithLossCellRnn实例和TrainOneStepCell训练网络。
[18]:
rnn_cf = RNN(n_letters, 128, n_letters)
optimizer = nn.Momentum(filter(lambda x: x.requires_grad, rnn_cf.get_parameters()), 0.0001, 0.9)
net_with_criterion = WithLossCellRnn(rnn_cf, criterion)
net = nn.TrainOneStepCell(net_with_criterion, optimizer)
net.set_train()

# 训练网络
def train(category_tensor, input_line_tensor, target_line_tensor):
    new_shape = list(target_line_tensor.shape)
    new_shape.append(1)
    target_line_tensor = target_line_tensor.reshape(new_shape)
    hidden = rnn_cf.initHidden()
    loss = net(category_tensor, input_line_tensor, hidden, target_line_tensor)

    # 返回一个序列最后一个
    for i in range(input_line_tensor.shape[0]):
        output, hidden = rnn_cf(category_tensor, input_line_tensor[i], hidden)

    return  output, loss / input_line_tensor.shape[0]
为了跟踪网络模型训练过程中的耗时,定义
time_since函数,用来计算训练运行的时间,方便我们持续看到训练的整个过程。
[19]:
import time
import math

# 定义可读时间回调字符串
def time_since(since):
    now = time.time()
    s = now - since
    m = math.floor(s / 60)
    s -= m * 60
    return '%dm %ds' % (m, s)
在训练过程中,每经过
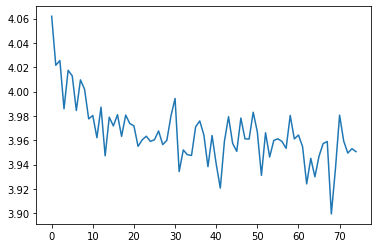
print_every(500)次迭代就打印一次,分别打印迭代所用时间、迭代次数、迭代进度和损失值。同时,根据plot_every的值计算平均损失,将其添加进all_losses列表,以便于后面绘制训练过程种损失函数的图像。
[20]:
n_iters = 7500
print_every = 500
plot_every = 100
all_losses = []

# 每经过100次迭代,就重置为0
total_loss = 0

start = time.time()

for iter in range(1, n_iters + 1):
    output, loss = train(*random_training())
    total_loss += loss

    # 分别打印迭代所用时间、迭代次数、迭代进度和损失值
    if iter % print_every == 0:
        print('%s (%d %d%%) %.4f'% (time_since(start), iter, iter / n_iters * 100, loss.asnumpy()))

    if iter % plot_every == 0:
        all_losses.append((total_loss / plot_every).asnumpy())
        total_loss = 0
5m 56s (500 6%) 3.7287
11m 37s (1000 13%) 4.1077
17m 8s (1500 20%) 4.0800
22m 51s (2000 26%) 4.1025
28m 28s (2500 33%) 4.0878
34m 3s (3000 40%) 4.0277
39m 38s (3500 46%) 4.0859
45m 22s (4000 53%) 3.9899
51m 7s (4500 60%) 3.5648
56m 52s (5000 66%) 4.0283
63m 34s (5500 73%) 4.0877
71m 50s (6000 80%) 4.0858
79m 42s (6500 86%) 4.1082
88m 11s (7000 93%) 3.7557
97m 32s (7500 100%) 4.0461
使用
matplotlib.pyplot绘制训练过程中损失函数的图像。
[21]:
import matplotlib.pyplot as plt

plt.figure()
plt.plot(all_losses)
[21]:
[<matplotlib.lines.Line2D at 0x7f7efddbead0>]

验证模型
在训练结束后,对获得的模型进行验证。这里,我们向网络中输入一个字母并推理得出下一个字母。将输出的字母作为下一步的输入,重复直到EOS标记处。
[23]:
max_length = 20

# 根据类别、起始字母、隐藏状态开始推理
def sample(category, start_letter='A'):
    category_tensor = category_to_tensor(category)
    input = input_to_tensor(start_letter)
    hidden = rnn_cf.initHidden()
    output_name = start_letter

    for _ in range(max_length):
        output, hidden = rnn_cf(category_tensor, input[0], hidden)
        topk = ops.TopK(sorted=True)
        _, topi = topk(output, 1)
        topi = topi[0, 0]
        if topi == n_letters - 1:
            break
        else:
            letter = all_letters[topi]
            output_name += letter
        input = input_to_tensor(letter)

    return output_name

# 遍历提供的字母,得到输出名称
def samples(category, start_letters='ABC'):
    for start_letter in start_letters:
        print('语言类型:%s 首字母:%s 输出结果:%s' %(category, start_letter, sample(category, start_letter)))

samples('Russian', 'RUS')
samples('German', 'GER')
samples('Spanish', 'SPA')
samples('Chinese', 'CHI')
语言类型:Russian 首字母:R 输出结果:Rrnarao
语言类型:Russian 首字母:U 输出结果:Uilehidaauritai
语言类型:Russian 首字母:S 输出结果:Sa
语言类型:German 首字母:G 输出结果:Gallh
语言类型:German 首字母:E 输出结果:Ehuhkiakena
语言类型:German 首字母:R 输出结果:Rcsahonuianah
语言类型:Spanish 首字母:S 输出结果:Stadlalugtnaaa
语言类型:Spanish 首字母:P 输出结果:Perahaiarsaorrol
语言类型:Spanish 首字母:A 输出结果:Aaan
语言类型:Chinese 首字母:C 输出结果:Cadco
语言类型:Chinese 首字母:H 输出结果:Hn
语言类型:Chinese 首字母:I 输出结果:I


