MindSpore Lite推理流程
![]()
本文将会以图像分割Demo为例讲解如何使用MindSpore Lite进行推理。
文章包含以下几方面的说明:
MindSpore Lite推理流程及Java接口的使用
如何在Android中部署Demo
运行依赖
完成Demo部署需安装以下依赖项:
Android Studio >= 3.2 (推荐4.0以上版本)
Android SDK >= 26 (Android Studio默认安装)
JDK >= 1.8 (Android Studio默认安装)
MindSpore Lite推理流程
推理代码流程如下,完整代码请参见 src/java/com/mindspore/imagesegmentation/TrackingMobile。
加载MindSpore Lite模型文件,构建上下文、会话以及用于推理的计算图。
加载模型文件:创建并配置用于模型推理的上下文。
// 加载segment_model.ms模型
Model model = new Model();
if (!model.loadModel(Context, "segment_model.ms")) {
  Log.e(TAG, "Load Model failed");
   return;
}
创建会话。
// 创建config并完成初始化
MSConfig msConfig = new MSConfig();
if (!msConfig.init(DeviceType.DT_CPU, threadNum, CpuBindMode.MID_CPU)) {
  Log.e(TAG, "Init context failed");
  return;
}

// 创建MindSpore lite session.
LiteSession session = new LiteSession();
if (!session.init(msConfig)) {
  Log.e(TAG, "Create session failed");
  msConfig.free();
  return;
}
msConfig.free();
加载模型文件并构建用于推理的计算图。
// 图编译
if (!session.compileGraph(model)) {
  Log.e(TAG, "Compile graph failed");
  model.freeBuffer();
  return;
}

// 当使用model.freeBuffer()时, 模型无法被再次编译
model.freeBuffer();
将输入图片转换为传入MindSpore模型的Tensor格式。
将待检测图片数据转换为输入MindSpore模型的Tensor。
List<MSTensor> inputs = session.getInputs();
if (inputs.size() != 1) {
  Log.e(TAG, "inputs.size() != 1");
  return null;
}

float resource_height = bitmap.getHeight();
float resource_weight = bitmap.getWidth();

ByteBuffer contentArray = BitmapUtils.bitmapToByteBuffer(bitmap, imageSize, imageSize, IMAGE_MEAN, IMAGE_STD);

MSTensor inTensor = inputs.get(0);
inTensor.setData(contentArray);
运行会话,执行计算图。
if (!session.runGraph()) {
    Log.e(TAG, "Run graph failed");
    return null;
}
对输出数据进行处理。
通过Tensor获取的输出数据得到其维度,批处理数,通道数等信息。
// 获取输出Tensor
List<String> tensorNames = session.getOutputTensorNames();
Map<String, MSTensor> outputs = session.getOutputMapByTensor();
for (String tensorName : tensorNames) {
  MSTensor output = outputs.get(tensorName);
  if (output == null) {
      Log.e(TAG, "Can not find output " + tensorName);
      return null;
  }
float[] results = output.getFloatData();
float[] result = new float[output.elementsNum()];

int batch = output.getShape()[0];
int channel = output.getShape()[1];
int weight = output.getShape()[2];
int height = output.getShape()[3];
int plane = weight * height;
将NCHW格式转为NHWC格式,放入到
float[] result。for (int n = 0; n < batch; n++) { for (int c = 0; c < channel; c++) { for (int hw = 0; hw < plane; hw++) { result[n * channel * plane + hw * channel + c] = results[n * channel * plane + c * plane + hw]; } } }
对输入Tensor按照模型进行推理,进行后处理。
将
float[] result数据转换成ByteBuffer数据格式。ByteBuffer buffer = ByteBuffer.allocate(4 * result.length); FloatBuffer floatBuffer = buffer.asFloatBuffer(); floatBuffer.put(result); return buffer;
将ByteBuffer数据格式转成Bitmap。
通过推理出来的数据在Bitmap每个像素坐标进行比对。如果坐标数据等于PERSON,坐标点颜色不变。反之,则改成透明色(如下图所示)。
Bitmap.Config conf = Bitmap.Config.ARGB_8888;
Bitmap maskBitmap = Bitmap.createBitmap(imageWidth, imageHeight, conf);
Bitmap scaledBackgroundImage =
        BitmapUtils.scaleBitmapAndKeepRatio(backgroundImage, imageWidth, imageHeight);
int[][] mSegmentBits = new int[imageWidth][imageHeight];
inputBuffer.rewind();
for (int y = 0; y < imageHeight; y++) {
    for (int x = 0; x < imageWidth; x++) {
        float maxVal = 0f;
        mSegmentBits[x][y] = 0;
            for (int i = 0; i < NUM_CLASSES; i++) {
                float value = inputBuffer.getFloat((y * imageWidth * NUM_CLASSES + x * NUM_CLASSES + i) * 4);
                if (i == 0 || value > maxVal) {
                    maxVal = value;
                if (i == PERSON) {
                    mSegmentBits[x][y] = i;
                } else {
                    mSegmentBits[x][y] = 0;
                }
            }
        }
        maskBitmap.setPixel(x, y, mSegmentBits[x][y] == 0 ? colors[0] : scaledBackgroundImage.getPixel(x, y));
    }
}

图1 推理前
图2 推理后
将推理后的图片与选择的背景图片相结合。
MainActivity.this.imgPreview.setDrawingCacheEnabled(true);
MainActivity.this.imgPreview.setBackground(isDemo ? getDrawable(IMAGES[selectedPosition]) : customBack);
MainActivity.this.imgPreview.setImageBitmap(foreground);
MainActivity.this.imgPreview.setDrawingCacheEnabled(false);
在Android中部署Demo
如果不具备Android Studio等开发环境,我们提供了本示例对应的APK文件,可以扫描下方的二维码或直接下载APK文件,并部署到Android设备后使用。

如果已经安装了前面所说的运行依赖,可以通过Android Studio编译并运行图像分割Demo。
运行结果如下图所示(以选取相册某张头像图片为例)。
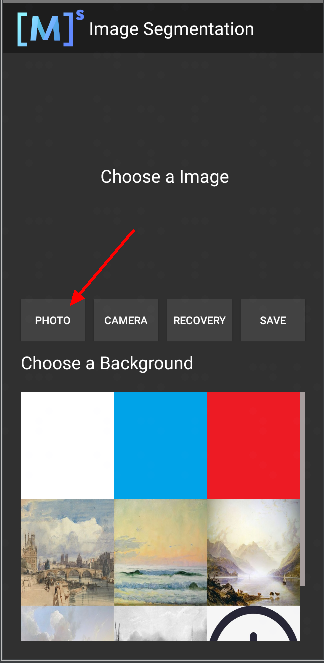
选取相册带有头像图片。
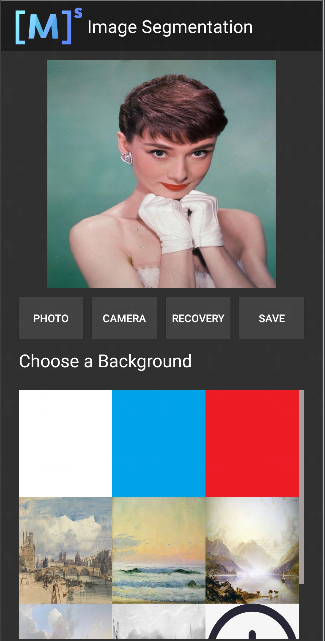
选择九宫格中不同的背景图片,即可对人像的背景进行替换分割。
 图1 白色背景 |
 图2 蓝色背景 |
 图3 油画背景 |